Wednesday, September 30, 2009

Badabing, badaboom, patio!

Our largest project of the summer was installing a patio where only poured concrete stairs existed before. After a few several design revisions, a smells-to-high-heavens skunk (stay tuned), a very painful (I'm assuming) injury, endless rainy days, and a lot of hard work (I'm assuming again), it was finally completed in time for my birthday weekend in May.

The summer before, we witnessed our neighbor take on the challenge of DIY patio and after five to six days of back-breaking labor, he ended up hiring Mike from Cutting Crew to finish it for him. However, before he threw in the towel, I convinced Justin to help him out for a day in hopes he would learn the ins and outs of patio installation for use in our future install. But, to no prevail, Justin called it quits after a half day. In those few short hours, his gloves wore thru and he had GIANT blisters on his pretty, little hands. So in fear that Justin would have no hands left after our patio installation, we went the pansy route and didn't lift a finger.

While Justin and I are pretty hands-on when it comes to projects (mostly to save a buck) we forwent doing this ourselves and hired the skillful and talented Mike from Cutting Crew. Not only did he come highly recommended, but he is also our dear friend. So, if you are in the Chicago-land area and need landscape, hardscape, or winter care, look him up, you won't be disappointed.


Mike did an awesome job and was a breeze to work with. Being a designer, albeit, not a hardscape designer, he let me have full control of the layout. I wanted to design our patio myself in order to make it truly custom (and you know I couldn't help myself). I knew we needed a spot for a dining set and grill, and we wanted a built in fire pit with a sitting wall around it. After the initial sticker shock of the first design, we went back and forth with him a couple times, changing our minds on the type of paving bricks and shortening or taking out a wall here or there, then eventually added it back in, trying to get the most bang for our buck and ending with this as our final design.


We were both overly excited to change this boring backyard and lawnmower's nightmare...


...into a one-of-a-kind social space for entertaining, making mouth-watering pudgey pies, and grilling those mighty-fine steaks.


B-e-a-u-tiful paver patio.

Monday, September 28, 2009

One Project Closer: September Giveaway

If you haven't entered in One Project Closer's September drawing, do it now before the time is up! They are generously giving away a $100 Home Depot gift card good for use online or in the store.


Have a fall project you need to tackle? I'm sure this gift card would sure come in handy right about now.

My family really loves me...or do they?

This past weekend I left Justin all alone and joined some female relatives for our annual Craftin' Cabin (CC) soirée in Edgerton, Wisconsin. I always look forward to this weekend because I get to see my Aunt, Grandma, and Mom without having to drive very far. We eat, drink, chat, watch movies, and listen to music, it's a great trip and the cabin is fully equiped for our needs. Typically, they use this time to try to catch up on their scrapbooks while I am generally glued to my laptop, but not this year. I am proud to say that I spent the entire Saturday on the sewing machine. I made it my CC mission to sew curtains for the remaining curtain-less rooms around my house (more on that later), so, when I arrived Friday night, I was ready to go.

I unloaded the mounds of stuff from my car and my Grandma showed me to my spot. Now, I must say that in addition to us four, there were five other women with us, four were my Aunt's friends and the other was my Aunt's mom, and it's no secret that the cabin is on the smaller side to squeeze 9 adults into 3 bedrooms, but hey, we'll do almost anything for a husband-, pet-, boyfriend-, or child-free weekend. However, when my Aunt sent our room assignments ahead of time it didn't dawn on me the accommodations sacrifice I was going to make. As my Grandma and I chit-chatted up the stairs she led me into the room she, my mom, my Aunt's mom, and I were going to share.


Great room, right? Do you see something missing? Because I did... like maybe a fourth bed...for me?


Oh, wait! What's behind the door and through that curtain back there?


It's another bedro-er-closet, with what looks like the most comfortable bed I've ever laid my eyes on.


Ah, bliss...


*I still love my family very much, I just like to give them a hard time.*

Friday, September 25, 2009

For the love of tomatoes

Look ma! I grew tomatoes with my very own two hands. (Well, of course with your help planting I guess you deserve partial credit too.)

These rosy reds came right off the vine last night. I planted my garden mid-May and while only 2 of the 9 tomato plants remain, I am still reaping plenty of benefits from my (cough, cough) hard work.

Thursday, September 24, 2009

Best of Canada's Style at Home: October 2009

While Justin and I were in Toronto, I couldn't pass up the chance to pick up some much needed "road trip" reading materials. (Me justifying my purchase to my better half.) One being Canada's Style at Home October 2009 issue. I found dozens of inspirational photos from this northern friend, but chose 10 of them to feature here.

The first two photos immediately caught my eye since I have been dreaming of a new bathroom mirror since we moved in. Imagine two of these round mirrors hung side by side above our double sinks.


I also love this version that displays the strap the mirror is hung from. I could see this being a DIY project by using a thick leather strap and some epoxy glue around the mirror to cradle it.


Since this issue is the magazine's Bathroom Issue, there are plenty of water-closet photos. While white isn't my color-of-choice for a bathroom, I couldn't help but swoon over the color palette in this bathroom. The white is evenly balanced with a vibrant turquoise painted wood floor, light turquoise above the wainscoting, and spots of poppy red.


I love how the owner framed scraps of wrapping paper to give the walls some pop-art and strategically placed Japanese toys to pump up the playfulness.


These Verner Panton chairs in this photo are fabulous. Especially when juxtaposed with the woodsey-looking cabinets.


However, when I turned the page, I stopped in my tracks. I had just spoken to Justin about mixing and matching the chairs in our dining room and low and behold, not only did this homeowner do just that, but in style. The aspects that make this work are that the tops of the chairs all have the same shape and they are the same color.


These dessert plates from Anthropologie also grace my top 10 list. Look how charming they look set in this place setting!


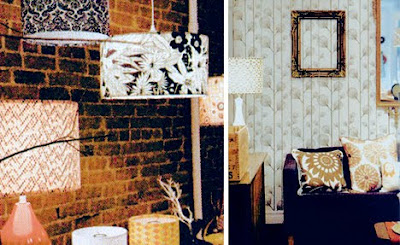
And last but not least, photos of displays in the store Buk & Nola located in the Canadian french city, Montréal. Suspending multiple drum shades in a row would look urban-chic over a credenza in a dining room. Additionally, I have recently became fond of wall paper and I love the look when an empty frame is hung on a graphic wallpapered wall.


Photos courtesy of Style at Home.

Tuesday, September 22, 2009

Heavenly Headboard

I created this headboard for our twin-bed guest room a couple months ago. It was a challenge because I wanted to frame it with 45º angled corners and on top of that wanted to tuft it. I found plenty of tutorials online about how to upholster a headboard, but never found the right one that taught me how to tuft it. Here's the bed before in all it's redness:


Somewhere in my mind a few years ago, the combination of the paisley sheets and red striped duvet cover made my heart pitter-patter. Unfortunately, I don't feel the same today. So in addition to a fabulous headboard for this lone ranger, it also got high quality sheets and a new duvet cover. Here's a photo of the frame in pieces.


I used a piece of MDF wood as the base. I cut the foam slightly smaller than the opening in the frame, glued it to the middle of the MDF, stapled down low-loft batting, and stapled down the satin fabric. I attached the frame edges next by screwing them on from the back of the headboard and tucked the edges of the fabric under the frame edges to hide the excess. The second to last step was to tuft the headboard. I drilled small holes in a grid pattern on the back of the headboard; pushed a heavy-duty needle through the hole; straight through the foam, batting, and fabric; threaded the needle through the button; and back out the hole. This took some straight shooting and was nice having a second person on hand to help feed the needle back. Then I threaded the needle through a small, flat button on the back of the board to anchor the tufted button on the front side. Securing a tight knot on that back button was the final tufting step and I dabbed a bit of super glue just to provide extra strength. The last step was to affix the legs to the back of the headboard. Here is the after:


Doesn't it look fab?!


A way to make it completely custom is to purchase a button cover kit. The buttons come in various sizes and it gives you instructions and materials to cover the buttons with whatever fabric you choose. I purchased the duvet after I finished the headboard, but little teal buttons would look fantastic instead. However, the covered buttons with the same fabric as the headboard creates a custom look. Magnifique!

Friday, September 18, 2009

Numero Uno

In this day and age of blogs and tweets, one more emerges. I welcome those that are reading my inagural blog. I hope to look back on this first entry into blogdom with pride and joy, as if I spent 20 hours of labor and triumphantly pushed this little sucker out. I don’t intend to create this for means of income, but I have been inspired to share my passion of design, decor, and happiness because of blogs such as Young House Love (formerly known as This Young House), Making it Lovely, and All Things G&D. I am a graphic designer who loves creative living and wishes to share it with all interested parties. So, please keep your arms and legs inside your browser, and enjoy the ride!
Related Posts with Thumbnails