Friday, May 28, 2010

Seeing stars in the future

What are you doing at 10 EST/9 CST on Sunday, June 13? I hope you are saying, "watching HGTV's new season of Design Star," because that's where I'm going to be!


Since Amazing Race and Desperate Housewives have concluded, I can't wait for Design Star to begin so Justin and I can reinstate our Sunday night ritual of watching the tube. Look at these designers, just waiting to have their dreams smashed by the panel of judges (Genevieve Gorder, Candice Olson, and Vern Yip). I love it!


In anticipation of the season premiere, I scoped out the contestants on HGTV's Design Star site and perused their portfolios that scored them a spot in the challenge. Here are a few of my favorites.

Rugged-western cowboy America
(Can anyone guess what retail store this is? I have no idea.)

Nina Ferrer

Relaxing, beachy patio in the city

Julie Khuu

Urban, industrial work space
(I immediately added this to my inspiration folder for my office redo this summer.)

Michael Moeller

Southern comfort, welcoming outdoor oasis

Trent Hultgren

Gotta love color!

Tom Vecchione

Mid-century modern man
(I especially enjoy the window treatment.)

Michael Moeller

Symmetrical sophisticated simplicity
(Say that 5 times fast.)

Michael Moeller

Based on their designs alone, my favorites are Julie Khuu, Michael Moeller, Tom Vecchione, and Trent Hultgren. Also, I'm going to go out on a limb and make an extremely premature prediction for the next HGTV Design Star, I elect Michael Moeller. Who is your favorite to win?

(All photos from HGTV Design Star site.)

Thursday, May 27, 2010

So you need a typeface, do ya?

I received a link to this flow chart in my inbox a few weeks ago and have been battling my internal designer, trying to decide whether I should share it or not.


It was created by Julian Hansen, a design student at the Danish School of Media and Journalism, and even though I love the execution, I find the whole thing frightening. I understand it is a creative exploration, but the person who sent it to me praised it for being a wonderful resource for the everyday person. I truly hope he created it for fun, without the intention for practical use.


If you're wondering why I am reacting so negatively towards this otherwise, good-looking design, it stems from the inclusion of Comic Sans as an acceptable font. Please, never use Comic Sans for anything. Nonetheless, I chose to post about it anyways because the copy is brilliantly written with a snarky attitude. To view it larger click here.

Wednesday, May 26, 2010

Compute this

On February 15, Best Buy launched an in-store e-cycling program in all of their US locations, and one of the many items they accept are old computers. Recently, my coworker got a new MacBookPro and chose to bring his old desktop PC in for e-cycling. However, before taking it, Best Buy told him to destroy his hard drive. The store had numerous reasons but their main one was that they did not want to be liable for the information on the disk. Fortunately, destroying a hard drive is an extremely easy process if it is less than five years old and a little more difficult if your computer is more than five years old, which my coworker's hard drive was, so he asked for my assistance. Also by destroying his hard drive, it reassures him to know that no one will be able to access the information in the future.

Generally, hard drives newer than five years have glass disks that a simple pound of a hammer will shatter, but hard drives that are more than five years old have metal disks that demand more extreme measures. Here is my coworker's ancient (in technology terms) 8-year-old 60GB Maxtor hard drive.


As you can see, it is pretty solid. So, to destroy this hard drive, I used my power drill to core a hole right through the area that the disks are in. My plan was to drill on each end of the drive to guarantee that the disk was thoroughly demolished.


After choosing my drill bit and making sure my safety goggles (my glasses) where in place, I got to it.


Justin wasn't home at the time, so while I held it down with one hand, my other hand held my power drill as it bore a hole in the drive.


Within a few minutes, I had successfully impaled the drive on one end.


And a short while later, the other end had a piercing to match.


I got a little drill happy and started a third, but it seemed my bit was exhausted and snapped in two. I took that as a sign to stop.


If you are still at a loss for how to disassemble and destroy your hard drive before recycling it, watch this video created by a few of Best Buy's Geek Squad agents.

Monday, May 24, 2010

Here's the dirt

With a forecasted high of 88ยบ F yesterday, I couldn't pass up the chance to get my hands/arms/feet/legs dirty and plant our vegetable garden.

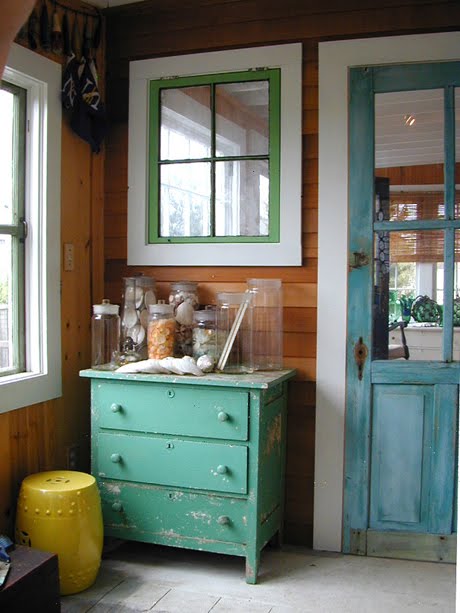
I started bright and early Sunday morning (don't ask me how I naturally woke up at 7:50 a.m.) and the first thing I did was scope out the location. My plan was to use the same space that I planted in the previous year, which produced mounds of tomatoes and plenty of other delicious goods.


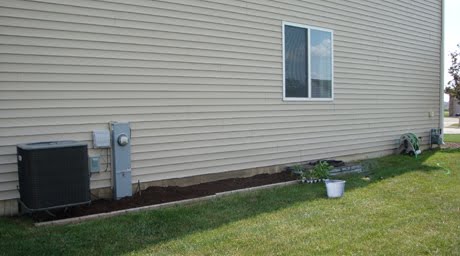
However, it didn't look like the picture above, but instead was looking tired and weathered as you can see in the photo below.


Most gardeners till their soil before planting because it breaks up hard clumps of dirt, kills weed roots, and, at the same time, aerates the soil, but since our garden plot is a measly 14x3 feet, I opted out of professional tilling for a few reasons: 1) I didn't want to wait until someone could come and do it, 2) I didn't want to pay someone money to simply mix up 42 square feet of dirt, and 3) I knew I could do it myself. Last year, when I was picking up the tools I needed to start my garden, an associate at Menards recommended an inexpensive handheld tool that he said did the job just the same as a tiller but with a little more sweat and sore muscles, enter the action hoe.


An action hoe looks similar to a regular hoe, but is a ring of metal rather than one flat piece. By digging this into the dirt, you are able to chop the clumps, tear the weeds, and push and pull the soil, aerating as you go. Oh, and did I tell you that it only cost $12? That's what I call DIY!

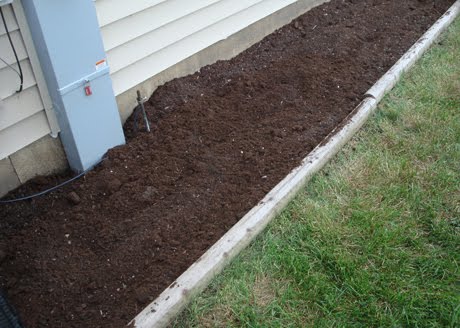
So, while I ran to the store to pick up the plant items I needed for the garden (more details below), Justin contributed to the project and tackled the dirt with the action hoe. When I got back, we mixed a few bags of garden soil in and the dirt was prime for planting.


Before I go any further, it wasn't as simple as saying "yeah, we mixed up the dirt and popped some plants in the ground." Oh no, there was some strategic planning that went into it long before digging in.

In order to delegate space for each plant I wanted to grow, I had to plan according to how much space and sun each one would need, and just like any other project, I whipped up a layout of the area (see below). Are you wondering why I didn't put the lettuce in front of the onions so that I had a neat grid? Although the majority of my garden is in full sun, the far left side is right next to our air conditioning unit, which at times blocks the sun. Since lettuce requires full sun, I had to go against my design gut and move them to the far right, out of alignment but in full sun.


After settling on a plan, I wrote up my shopping list accordingly. It included a bag of onion sets, green bean seeds, half a dozen tomato plants, some pepper plants (hot and sweet), and a few lettuce plants. One tip that my mom showed me when she helped me plant my garden last year, was to look for plants that are doubled up in their pots. If you get lucky and find some like this, you can separate them once you get home, getting more bang for your buck.


It may seem scary to divide them once you're home, but it really isn't. All you do is remove the soil ball from the pot it came in and soak it in a bucket of water. This will wash away the soil and you'll be able to carefully pull the two apart and plant as usual. For the first week or so, they might look small compared to other plants, but once they've established themselves in the ground, they'll flourish.

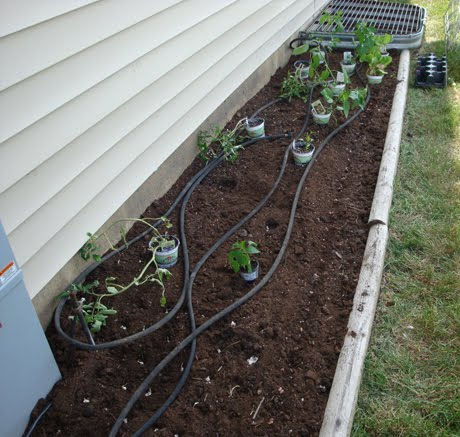
Back to the project: Once you have your dirt ready, place your plants where you are going to drop them in. By leaving them in their pots until ready to go into the dirt, you can play around with spacing to make sure each has enough room to grow.


It only takes a few minutes to plant each seedling and soon enough you will have a good-looking garden ready to produce some home-grown sustenance.


Out of the 100 pack of white onion sets that I snagged at Menards for $1, I was able to drop in about 60 of them. This year, I took the time to organize them in rows, just to make it look more uniform.


And just like last year, I planted a row of green beans along the front of the plot so I can access them easily when we need some veggies for dinner.


In addition to buying plants, I grabbed a bag of plant markers for $2 so I was able to label each plant.


The markers will come in handy, especially when harvesting our peppers since some are sweet and some are hot. I don't want to mix them up!


After making sure the tomatoes were leaning on their wire cages and ensuring the onion sets were facing up, I doused the whole thing with a good drink of water, thanks to my soaker hose, another one of my mom's recommendations. This morning, before racing off to the train, I ran outside to make sure they made it through the night. I look forward to virtually sharing the fruits of my labor with you all in the coming months.

Did anyone else have a productive day enjoying the nice weather?

Friday, May 21, 2010

Blog Love: Ikea Hacker

Little to my knowing, our fabric paneled wall was featured on ikea hacker yesterday!


Head over there and check out all the Ikea hacking going on all around the world.

Thursday, May 20, 2010

What color is your personality?

It's not a secret that I love to take quizzes. Quizzes about what font matches my personality, if I can distinguish a high-end piece of furniture from a wally-world item, and, of course, what design style I am. In fact, sometimes I seek them out, but the one I'm sharing with you today I heard about in a weekly email that I received from HGTV last week, it is called What color is your personality? and promises to determine what colors suit your personality the best.


After answering the seven quick questions, I even got to answer a bonus question. Which one do you think I picked? (Hint: I just painted over my yellow half bath.)


According to HGTV and their partners on this web feature, Glidden paint, I have been officially labeled Natural and Serene.


I'm not going to lie, I don't think these results are particularly spot on, but the bit about my color personality palette does in fact consist of greens and browns. So I give it 1.5 thumbs up. What is your color personality?

Tuesday, May 18, 2010

Happy Birthday to Me

If you didn't know, now you know—it's my birthday today! Here are some birthday related items I found on Etsy that I would be more than pleased to receive.

Happy birthday gift tag by seasonaldelights.


Sasquatch birthday card from OrangeTwist.


Happy birthday cupcake stand from vesselsandwares.


Cheers!

Monday, May 17, 2010

Chicago's Merchandise Mart Spring Sample Sale

Have you ever heard about Chicago's Merchandise Mart Spring sample sale and wondered what exactly happens during it and what kind of deals you can score? Well I have! So when I received an email a few weeks ago advertising the sale happening May 14 & 15, I added it to my schedule.

When my calendar reminded me of the sale last Friday, I couldn't wait for my lunch hour to roll around, and as soon as the clock chimed 12, I hit the pavement. Merchandise Mart isn't terribly far from my office, but a well paced walk can still take 10-15 minutes. Upon entering through the doors, I felt the crisp air conditioned air and headed straight to the elevators, traveling up to the 15th floor, the first floor of the sale.

As soon as I stepped out of the elevator, I was greeted by a concierge and handed a flyer listing the stores participating in the sale on floors 15 through 18. I thanked her and started looking around. I wasn't sure what to expect, but was pleasantly surprised to see that even though the layout was essentially an office building, instead of large corner offices and conference rooms there were interior design home decor shops. Heaven!

I immediately developed a clockwise strategy to browse each floor within my limited amount of time. The following photos show you some stores and their samples for sale lining the hallway just outside their doors.


Although, some hallways were full, others were completely empty, and some stores invited you in to shop their samples. On the other hand, other shops would only allow you in their stores if you were in the trade and if you weren't, the sales associates would usher you out the door (reminding me of a bouncer at a club).


After looking at a few items, I quickly learned that this wasn't a sample sale I was going to be spending money at. I was hoping to see some real steals, but unless you think a dining room set originally priced at $4200 on sale for $1800 is a can't-miss opportunity, you might want to visit the sale for personal enjoyment rather than hoping for a $50 persian area rug.

Nonetheless, these were some items that I was majorly crushing on:
Faux fur pillows and throws that were so soft you might have mistaken them for real fur.


Tons of somewhat discounted wall art.


These super sweet gilded bird motif finger bowls.


This really cool drum pendant shade, which I'm still kicking myself for passing up.


All being told, I had fun shopping the sample sale, even though I didn't buy anything. I'm not sure if I will return again, I'm more of a $15 dining room table kind of gal, but it was interesting to see what is considered by the trade "high-end" decor items.

Has anyone else shopped Chicago's Merchandise Mart sample sale? Did you score a deal or just had fun looking?

Tuesday, May 11, 2010

We've moved!

The title of today's post may be slightly misleading, we have not moved to a different home per se, but we have moved in a digital sense. In celebration of writing over 100 posts (today's post marks 105), I purchased the domain name for thedesignslice.com. I've been meaning to do it since I start writing last fall, but wanted to be sure it was a worthy investment and a commitment I was ready to make. (I guess this means it's both.)


So, go update your bookmark with the new address, or make your life even easier and subscribe to receive the design slice in a reader.

Monday, May 10, 2010

Best of CS Interiors: Spring 2010

As soon as I saw the newest issue of CS Interiors on the newstand, I grabbed myself a copy. Not only does this publication have great photography, it is one of my favorites because it is specific to the Chicago area. In past issues, I've posted information about Chicago vendors or other Midwest designers (read them here and here), but in this issue, I am loving local interior designers.

Such as this inviting entry in designer Tom Stringer's home in Belmont Harbor, which is one of the homes participating in the Chicago City Day School house tour. I love the color scheme of creamy neutrals and rich deep browns, but my favorite part is in the far right back of the photo. The grid of black framed photos with generous white mattes look like an art gallery installation and something that can easily be copied in any home.

Photo from CS Interiors

The next photo that captivated me was of this room designed by Jordana Joseph. A few of the many things that I am crushing on in this room are: the color palette and the Jonathan Adler accents. I think this may be the color scheme I go with in our TBD office.

Photo by Bob Coscarelli, CS Interiors

Next on my list of favs is this photo from a house in Bucktown designed by Aimee Wertepny. Talk about modern glam! The mix of shiny tile, the crisp white mantel, and the red art make this wall striking.

Photo by Tony Soluri, CS Interiors

Designer Amy Lehman, gives us the pleasure of the next two photos and all I can say is texture, texture, texture! There is so much visual interest in her dining room I don't know what to focus on. The oven? The antlers? The windows? They're all so lovely!

Photo by Tony Soluri, CS Interiors

How cool would it be to have a swing in your house? Well, just ask Amy Lehman because she's got one, and it's super cool. Being a fan of swings myself, this image definitely made my list.

Photo by Tony Soluri, CS Interiors

The second to last photo from the spring issue is of Dave and Jeannette Jordano's home. The combination of funky chairs and the collection of hulk fists would make any dinner party in this room a blast. It especially hits home with me because the hulk hands are flea market finds—score!

Photo by Dave Jordano, Michelle Litvin, and Leah Missback Day, CS Interiors

This last image digresses from my theme of Chicago-land designers but for reasons, as you can see, I still had to include it. This is a shot of the interior of Po Dog Coffee hot dog shop on Capitol Hill in Seattle designed by Pb Elemental. The oversized photo of the pug dog is ultra cute and adds playfulness to the otherwise basement-looking space.

Photo by CS Interiors

And those are the images that top my list from the spring issue of CS Interiors. If you don't live in the area, but want to see what's up in the interior design world of Chicago, flip through or download the digital edition from their website here.
Related Posts with Thumbnails